BLOG
Shooting a wedding
Shooting Wedding
Capturing weddings can be the most stressful but fun thing to shoot. But for me I love shooting weddings and love being able to capture those precious moments for my clients and seeing the smile on their faces when I hand the images over to them for viewing.
The key things for weddings to know are:
• Getting to know your clients:
The first meeting is always the most crucial part for a couple looking to get married. Building that connection with the couple and making them feel comfortable for them to trust you and hire you to capture their special day. Spend some time chatting to the bride and groom, find out their story and get to know them. It is also a great time for them to get to know you as well. They are here to find out what they are hoping you as a photographer will be able to achieve for them in capturing the special moments of their lives and what they expect of you. Pre-wedding shoots is a great way for you and the couple to get comfortable with each other and for the couple to understand how you work and for you as a photographer to understand what the couples want.
• Contract
Make sure to always have a signed contract between you and the bride and groom. A contract is there to describe the fees, services and products offered to the couple. It will also protect you as a photographer. It is best to hire an attorney to create a contract suited for you.
• Preparations
Ask for the schedule for the wedding, finding out the times of the import parts of the day making sure not to miss a moment. If it is your first time going to the church, location and reception, make some time to visit the places. It is important to know what to expect at the locations and prepare as you don’t want to turn up at these locations and see something you were not expecting. This could throw you off from what you planned to do. Eg. Church, whether or not flash can be used as you won’t know how good the light is. Check out the location and find some key sections where you can take the couple for some shots (make sure the couple is aware that a permit may be needed and to organise getting the permit). Visit the venue to see the lighting that is used in the venue.
• Equipment
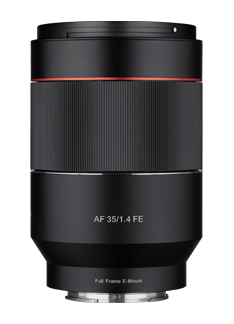
Go through your equipment a week before the wedding making sure sensors are cleaned, lenses and cameras are functioning well (if there is an issue with any of the items you have time to get a replacement). SD cards are in working order and formatted (You don’t want to turn up to a wedding and realise your SD card was either Full or faulty). Also make sure to have extra SD cards. Take spare batteries as depending on how long you are shooting the wedding you may need to swap batteries. The last thing you need is having your battery to go flat and no spares to continue capturing the day. Always carry two camera bodies; one main body and one backup. My main body, the Sony a7iii, will have my Samyang 35mm f1.4 AF lens, as this is my most used lens for weddings. My backup body, my Sony a7Riii will have either my 85mm f1.4, 70200 f2.8 or Samyang 50mm f1.4 AF, depending on the venue. Have a good bag to carry your items in, I currently use the Tenba Roadie Roller 24 which will fit all my bags and as it’s a roller, it’s easy to carry around. The Tenba bag has a cable lock so you can tie it to places and know that no one will come and pick up your bag. I also use the Spider Holster Light Belt to carry my gear throughout the day instead of camera straps. The reason I use the Spider Holster is because I am on my feet all day and having straps puts a lot of strains on your shoulders. Whereas the Spider Holster distributes the weight around your waist and frees your shoulders so you will not have any pain at the end of the day. Finally, the most important thing is flash. I have 2x Godox V860ii flashes and I bring either my Godox ad200 with Magmod Sphere and Grid or the Ad600 for location shoots.
• Ceremony and Reception
With the ceremony, majority of worship places do not allow flash (it is important to ask, as you don’t want the priest or person who is performing the ceremony to stop and ask you to turn your flash off in the middle of the wedding). It is best to have a camera that handles low light really well and be able to increase your ISO without adding grain. As an example, with the Sony cameras, I am able to shoot up to ISO 12800 with very little noise. It is important to have fast lenses especially for low light with worship places and reception. I generally use primes with an aperture of f1.4 or a 70200 zoom which is a f2.8. That way you allow more light through your lens without increasing your ISO too high. Key moments to capture during a ceremony would include the bride walking down the aisle, exchanging the rings and the first kiss. These moments are very important to capture and should not be missed. During the ceremony it is good to blend into the crowd and capture candid shots of the guests laughing and having fun. For this I would use my 85mm f1.4 (Hopefully Samyang will release an 85mm f1.4 AF and a 135mm f2) or 70200 f2.8. This way I can get some nice close tight shots at a distance without being seen. It is best to capture emotions as they are happening.
• What you need?
Make Sure to bring snacks and water as it will be a long day and you won’t have enough time to stop somewhere where you can get something. Dress appropriately for a wedding as you want to blend in and be able to capture those special candid moments of the guests or couple. You don’t want to stand out. Wear comfortable shoes as being on your feet the whole day without a break is tiring. I’ve had my fair share of uncomfortable shoes where it killed my feet. Invest in a good pair as without your feet you won’t be able to work.
• What to do after a wedding?
The first thing you do when you finish a wedding and get back home or to the office is BACKUP your images. As you don’t want to accidentally delete them or something happen to the SD cards and you lose all the images. That is the last thing you or the couple needs.
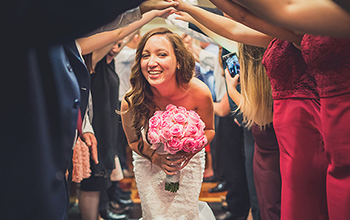
A lot of people always ask me, why do I use the 35mm 90% of the time. First of all I am a prime shooter and the only zoom lens i use is the 70200 f2.8, which is mainly used at the ceremony. For me the 35mm is my favourite focal that allows me to get close to my subject for some nice detail shots and to capture images showing more of what is happening around your subject. The f1.4 is great in low light and produces a stunning bokeh or background separation. Below are images I have captured during a wedding using the 35mm.
Sony a7iii + Samyang 35mm f1.4 AF – ISO 640, f1.4, Shutter 1/250 (Natural light)
Sony a7iii + Samyang 35mm f1.4 AF – ISO 100, f3.5, shutter 1/5000. Godox ad600 w/27inch beauty dish


Sony a7iii + Samyang 35mm f1.4 AF – ISO 100, f3.5, shutter 1/5000. Godox ad600 w/27inch beauty dish

Sony a7iii + Samyang 35mm f1.4 AF – ISO 100, f3.5, shutter 1/2500. Godox v860ii flash
Sony a7iii + Samyang 35mm f1.4 AF – ISO 500, f1.4, shutter 1/250. (ambient light from reception)


Sony a7iii + Samyang 35mm f1.4 AF – ISO 500, f1.4, shutter 1/250. (ambient light from reception)

Sony a7iii + Samyang 35mm f1.4 AF – ISO 800, f1.4, shutter 1/250. Godox v860ii

Sony a7iii + Samyang 35mm f1.4 AF – ISO 1600, f1.4, shutter 1/250. (Ambient light)

Sony a7iii + Samyang 35mm f1.4 AF – ISO 5000, f1.4, shutter 1/250. (ambient light)

Sony a7iii + Samyang 35mm f1.4 AF – ISO 2000, f1.4, shutter 1/250. (ambient light)